
How to Install WPC Decking: A Step-by-Step Guide for First-Time DIYers
May 21,2025

Did you know that WPC decking combines recycled plastic and wood fibers to create one of the most durable outdoor solutions you can find today? This innovative material stands out from traditional timber with its low water absorption rate, making it substantially more weather-resistant.
Many DIY enthusiasts feel overwhelmed when they first tackle WPC decking installation. The good news is that beginners can handle this project with proper guidance. WPC decking gives you an authentic wooden finish and feel that's eco-friendly and sustainable.
This piece walks you through every step you need to install your own WPC decking. We've got you covered with clear instructions that take you from ground preparation and tool selection to the final board installation. Let's reshape the scene of your outdoor space together!
Prepare the Area and Tools
A successful WPC decking project starts with the right preparation. You need to get your tools ready and prepare your installation area really well before you begin.
Let's look at the tools you'll need to install your WPC decking:
- Measuring Tools: Tape measure and spirit level
- Cutting Equipment: Circular or miter saw
- Power Tools: Drill with screwdriver bits
- Assembly Aids: Rubber mallet, string line, and decking board spacer
- Safety Gear: Safety glasses, ear protection, gloves, and dust mask
Your materials list should include WPC decking boards, joists, starter clips, screws, and possibly end caps or expansion clips based on your design. You'll also need concrete or compacted gravel to create a stable base.
Start by marking your deck's area with string and pegs. Remove all grass, plants, and debris from the site. This cleanup helps create an even foundation and protects your WPC decking.
The next step involves digging the area to a level depth of about 50mm. This creates room for your foundation materials. Your decking needs proper drainage, so plan for a slight 2% slope that helps water flow away and prevents damage.
A weed control fabric over the entire area will save you from future maintenance hassles.
Your subframe supports need the right positioning. If you choose concrete pads, dig 150mm x 150mm squares at a 150mm depth and fill them with quick-drying cement. Make sure they're perfectly level before the cement sets.
Check for underground utilities before you start digging. A cable avoidance tool will help you spot any hidden cables or pipes in your planned deck area. This step prevents expensive problems later.
Now that your site is ready and you have all your tools, you can move on to installing the subframe - your WPC decking's vital support structure.
Install the Subframe

A solid WPC deck starts with a well-built subframe. Building this support structure needs close attention to spacing, levelness, and the right materials.
Your joists should be spaced at 16 inches on center for standard builds. Areas that hold heavy items like hot tubs or large furniture need closer spacing at 12 inches to stop sagging. Smaller areas with heavier decking boards can handle 24-inch spacing, though this isn't too common.
Levelness plays a vital role in joist installation. String lines should run often across joist tops to check their arrangement. You'll need to cut away high spots or add shims to low areas. This careful leveling stops your deck surface from becoming uneven, which could affect its looks and safety.
Blocking between joists makes your subframe stronger. This method adds rigidity by a lot and keeps the structure from twisting or sagging as time passes. The best results come from placing blocks along the perimeter or at mid-span points.
House-attached decks need a ledger board as their key component. This board holds up joists at one end and adds needed stiffness to the frame. The ledger's top edge should sit below where you want your finished deck height - just leave room for your decking board thickness plus about 1/8 inch for flashing.
Your subframe material options vary widely. Pressure-treated timber costs less but might not last long if it gets wet often. Composite joists resist water better and won't rot - great features for low-lying decks. Aluminum joists give you the best durability since they don't rot, warp, or buckle with weather changes.
Take time to inspect everything fully before finishing your subframe. Look for any screws or nails sticking out and make sure all joists are firmly secured. Note that extra time spent on your subframe now can add years to your deck's life, so this stage deserves the extra effort.
Lay and Secure the WPC Decking Boards
The most rewarding part of your decking project starts when you install the WPC boards for your finished surface. This step needs careful attention to detail and proper spacing.
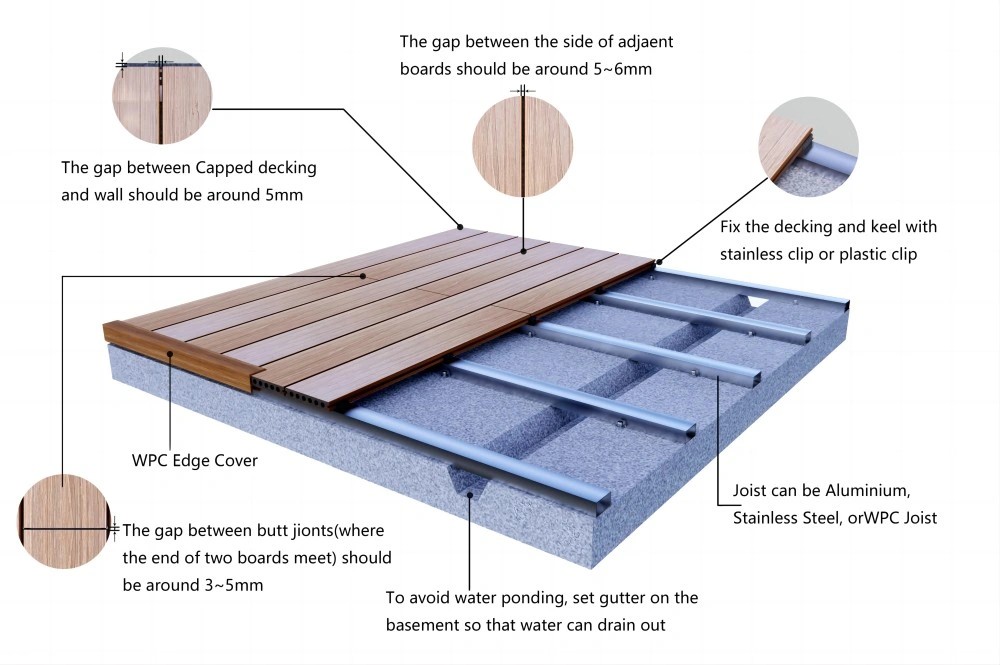
Your first task is to attach starter clips to the joists around your deck's perimeter. These clips give you a secure starting point for your first row while keeping the right distance from walls or boundaries. Most manufacturers suggest leaving about 8mm between the starter clip and wall.
Take your first WPC decking board and place it on the starter clips. Make sure it lines up with your joists. Use a rubber mallet to tap the board gently into place against the clips. This first board sets the alignment for your entire deck, so take extra time to check it's perfectly straight and level.
As you add more boards, put spacers between them to keep the gaps consistent. Different manufacturers recommend different spacing, usually between 1/8" (3.5mm) to 1/4" (6.5mm). These gaps are crucial because they:
- Let the boards expand and contract naturally
- Help water drain properly
- Create proper airflow to stop moisture buildup
Hidden fastener systems look cleaner than visible screws. Most WPC decking has slots on the sides that work with these fasteners. Put the fasteners between boards and screw them into the joists to create both a connection point and proper spacing.
Keep checking your boards with a spirit level as you work. You can cut boards to fit using regular woodworking tools like circular saws, table saws, or miter saws with carbide-tipped blades. It's also important to pre-drill holes when screwing directly into WPC boards to prevent splitting.
The final row might need another set of starter clips on the opposite side where you'll work backwards. Cut the second-to-last board to fit while keeping your spacing consistent throughout.
WPC material reacts to temperature changes rather than moisture. You should follow the manufacturer's guidelines carefully about spacing adjustments for different installation temperatures.
Conclusion
Your WPC decking project should be complete now that you've followed all these steps. Of course, installing composite decking needs careful preparation and attention to detail, but the results make the effort worthwhile. A beautiful, durable outdoor space comes from proper area preparation, subframe installation, and secure board fitting that will last many years.
WPC decking's most important advantages beat traditional wood easily. This material stands up to rot, warping, and fading while needing very little maintenance compared to timber options. On top of that, it uses recycled materials, making it perfect for eco-conscious homeowners.
First-time DIYers might find some parts challenging, but patience and the right tools make this project totally doable. Make sure to check all measurements and material quantities before you start to avoid any holdups. The weather plays a big role too - dry days give you the best working conditions.
Building your own WPC deck saves money and teaches valuable skills for future outdoor projects. You should feel proud of what you've built and your family will enjoy this new outdoor space for years. Without doubt, your new WPC deck will become everyone's favorite gathering spot and handle whatever weather comes along.
Related Posts
Are you looking for a reliable environmentally friendly composite flooring manufacturer?
We can quickly provide customers with market analysis, technical support and customized services.
Are you interested in our product?
Our professional sales team is waiting for your consultation.
WhatsApp:
E-mail:


